Building a Blog with Ember (Part 4) Converting to a Progressive Web App
In the previous part of the series, we saw how to pre-render pages at build time to deliver static HTML at runtime using Fastboot and Prember.
While I'm pretty satisfied with the current performance of this blog, I think we can take it even further by converting the blog to a Progressive Web Application (PWA).
Therefore, the goal for this part of the series is to be able to add the blog to your home screen, have a more immersive user experience by providing a full-screen view of the page as well as serving content offline-first.
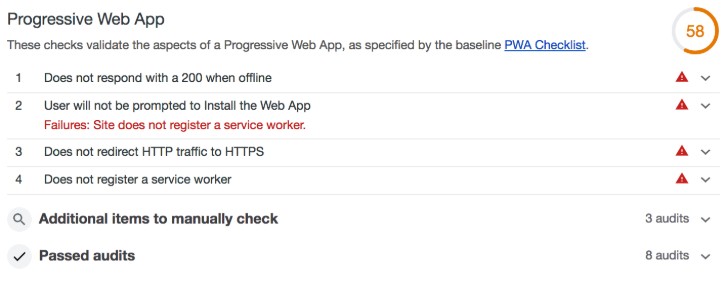
Using the Chrome developer tools, we can run a Lighthouse audit to get instructions on what we need to implement in order to convert the blog into a PWA. Currently, this is the result of said Audit:

As you can see, there is still some ground to cover. What stands out in the audit is that three of the six points mention a so-called manifest. This appears to be a good starting point.
Adding a Web App Manifest
The Web App Manifest is a JSON file that supplies the browser with information about the web application. Its main purpose is to make the web application installable to the user's device.
Just like before, we'll make use of Ember's excellent community and the addons they provide to achieve our goals. Let's start by installing ember-web-app to help us configure the web manifest:
ember install ember-web-app
During installation, the addon already created the relevant file under config/manifest.js. The generated manifest comes with a default configuration that displays your app as a standalone application, similar to a native app. Adjust it to your needs and — most importantly — add a couple of icons. The icons are required to let users add the web app to their home screens. The resulting manifest will look like this:
'use strict'

module.exports = function() {
  return {
    name: 'lost-in-technology',
    short_name: 'Lost in Tech',
    description: '',
    start_url: '/blog',
    display: 'standalone',
    background_color: '#fff',
    theme_color: '#fff',
    icons: [
      {
        src: '/assets/images/favicons/android-chrome-192x192-7a4a5f112c60132e8febe0877e8208f3.png',
        sizes: '192x192',
        type: 'image/png',
      },
      {
        src: '/assets/images/favicons/android-chrome-512x512-518c3b811a644ccb48aecc3f5b86aa83.png',
        sizes: '512x512',
        type: 'image/png',
      },
      {
        src: '/assets/images/favicons/apple-touch-icon-a38eb8901fa4c3f900253c4f359c6706.png',
        sizes: '180x180',
        type: 'image/png',
        targets: ['apple'],
      },
      {
        src: '/assets/images/favicons/mstile-150x150-e29c0c01301d23e4ede81e6966612d30.png',
        element: 'square150x150logo',
        targets: ['ms'],
      },
    ],
    ms: {
      tileColor: '#fff',
    },
  }
}
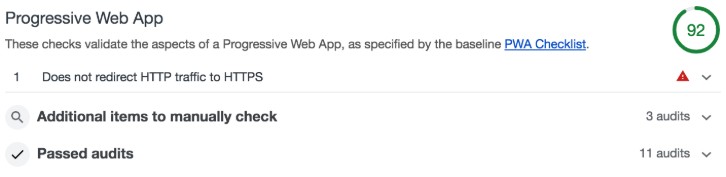
If we run another audit, we can already see some improvements:
Next, let's make use of another technology called Service Worker. The worker is basically a proxy between your web application and the network. It can intercept requests made by your application and decide how to handle them. This can be useful for several use cases. One of them is to serve assets or content cache-first if available, without even making a network request.
Again, we'll make use of community addons. Install them:
ember install ember-service-worker
ember install ember-service-worker-index
ember install ember-service-worker-prember
ember install ember-service-worker-asset-cache
These plugins will take care of a couple of things:
- ember-service-worker removes the need of writing the boilerplate code yourself that compiles and registers the Service Worker
- ember-service-worker-index will cache your application's
index.htmland make it available offline - ember-service-worker-prember will additionally cache the
index.htmlfiles that Prember generates - ember-service-worker-asset-cache will cache your application's assets, by default it will cache all assets located in
public/assets/
If you followed the series up until here, you might be as amazed as I was when I first tried implementing a Service Worker into an Ember application. Just by installing the aforementioned addons and with no configuration at all, (basically) all points that were necessary to make the audit pass have been dealt with out of the box:
This is what really shows the strength of Ember and the community around it to me. The amount of time you can save by installing these kinds of plug-and-play solutions to common problems can save time and energy.
There are three things to note though. First, Prember is — by default — not running during development. This might falsify the audit results when it comes to serving content with JavaScript disabled. If you use Prember and want accurate results, make sure to start the development mode with:
PREMBER=true ember serve
Second, the asset cache will cache all assets by default. If you are having a large number of assets, you might want to configure the addon yourself and exclude some of the non-necessary assets. Refer to the documentation for more information on how to configure the addon to your needs.
Third, as you might notice from the screenshot above, the audit still complains about redirecting from HTTP to HTTPS. While it is possible to use HTTPS in development, it's usually not worth the effort. Most providers already take care of this problem in production environments and if you are hosting yourself, you can take care of this by modifying your webserver accordingly.
And that's it! Merely by installing a couple of addons we converted the blog into a Progressive Web Application that now allows us to add the application to our home screen. Additionally, since the content is served cache-first now, you can still continue using the application even when the network is flaky. Awesome!